- This topic has 0 replies, 1 voice, and was last updated 4 years, 5 months ago by
.
-
Topic
-
The mast only weighs 6Kg but people who lack physical strength or suffer from a disability may still struggle to lift into position on the mast step unless you use the technique described below and shown in the rigging video starting at 6.30.
Tip: Point the boat away from the wind direction as that will help you to lift the mast upright
Tip: If you have issues with the T-balls dropping out when you lift the mast, use foam ear plugs to hold them in place.It’s easier to lift the mast into place in stages allowing you to adjust your grip, rather than trying to do it in one go.
NOTE: Keep the forestay in your lower hand as you lift the mast. Adjust your grip at each stage of the lift.
1) Having inserted the t-balls for the side stays. Hold the mast and stays in the middle (near the join between the two sections) or centre of balance and lift the mast off the deck, then and place the the base on the ground and turn it vertical. Position the base near the float rest (aka Moosehead).
2) Adjust your grip down the mast a little so you can lift it onto the float rest closest to you.
3) Adjust your grip down the mast again and move so you are standing alongside the boat near the mast step.
4) Lift it onto the mast step and keep tension on the forestay by moving your hand toward the bow. Then tie the forestay loosely to the ring on the bow.
NOTE: Check the T-balls are properly seated in the mast by pulling on the side stays in turn. If they are sticking out at an angle, try giving a yank to get them into place. If they fall out or fail to seat properly, lower the mast and adjust them.
5) Next rasie the mainsail as keeping the forestay loose makes the mast tip more flexible and easier for the sail to run up the track.
6) Insert the bowsprit and hoist and tension the gennaker, then tension the forestay and tie it off as per the manual – the tension of the gennaker pulls the mast forward and this loosens the forestay.Mast raising from the cockpit
Another suggestion for those who have trouble lifting the mast into place from Japan.
1. Rig all halyards and stays on the mast. Leave the mast so the mid point is near the mast base plate. Take the gennaker halyard and cleat the loose end on the mast cleat.2. (see video at 7.20) Climb onto the boat via the ama support (don’t step on the end!) and stand either side of the cockpit. Lift the mast from the mid point and rotate it vertically so you can put the foot in the base plate.
3. Check T-balls from stays are properly set in the mast and stays and halyards aren’t tangled.
4. Hoist gennaker to hold the mast in position but not too tight so that the mast top can flex to make hoisting the main up the track easier.
5. Raise the mainsail (leave the mainsail hook detached until about to launch), then tighten the gennaker halyard, lash the forestay and tighten enough to raise the amas.
6. Install the jib and attach the jib sheets. If windy, leave the jib down until just before launching.
Derigging
7. To drop the mast reverse the process – loosen the gennaker halyard a little and drop the the main and jib first, drop the forestay, then stand on the boat and hold the mast forward with one hand while uncleating and dropping the gennaker.
8. Hold the mast with boat hands about 75cm (30″) apart and turn it horizontal then lower it onto the deck. Get off the boat and derig as normal.
Tip: Tie a Ronstan Shock into the bowline for the forestay line where it’s tied to the loop at the end of the wire. This provides a 2:1 ratio making tensioning easier without the loops binding. Pull downwards to allow you to use your weight to add tension so that the amas rise a little in the process.
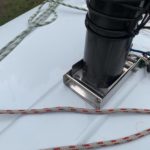
Hinged Mast Step
If you have difficulty raising the mast, a hinged mast step is available from Weta which makes the process easier – provided you use the correct technique – shown here by Keith Chidzey.Raising the mast with the hinged mast base
1. Always lift the mast in line with the base – it is not designed to take the force exerted on it if lifted from the side and this may cause the hinged plate to bend.
2. Tie a length of rope and a block to the trolley so that you have the rope in your hand as you raise the mast.
3. Use a Y-shaped support to raise the middle of the mast off the deck to make it easier to hoist.
Tip: You may find this is easier to achieve if you stand inside the cockpit to raise the mast.Installation
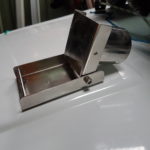
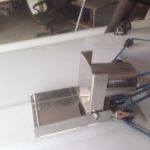

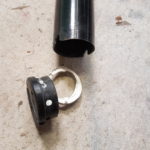
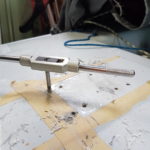
The plug on the foot of the mast needs to be removed and new holes may need to be drilled in the deck to take the mounting screws (new version of hinge will line up with existing holes).
Soft Mast Hinge Alternative
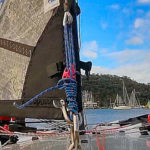
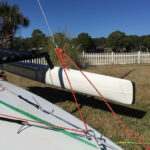
Linda Wright, who has completed the 300 mile Everglades Challenge in the Weta and currently holds the record for a single female in the sailboat category, developed the following method for hoisting the mast:I have posted some photos to help illustrate how I (being challenged in height and upper body strength) step the mast by myself. The mast is very light, but I still find it to be a shaky affair and prefer a more secure means of stepping and unstepping the mast, even though it takes a little longer to set up.

First, install a small pad eye at the base of the mast on the forward side.
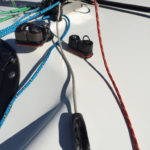
Step 1. Run a single, continuous line from pad eye at base of mast, through a downhaul block on the bar immediately behind the mast (starboard side), through a cleat (starboard side), through a cleat (port side), through a downhaul block on the bar (port side) and tie to pad eye again.
Cleat in such a way that there is enough room to move the mast forward by one diameter of the base.
Step 2. Tie on a second, much longer lashing line to the forestay, lead back to one of the jib sheet cleats and hang it on the horn cleat on the mast so you can reach it later. Now, you can unlash the primary lashing line completely. Then un-cleat the long line to let the mast rock back a little bit on the bar …enough so that you can just see part of it showing at the groove and re-cleat it.
Step 3. Get into the boat and lift the mast straight up off the bar and set on deck just forward of the mast base (base tether line should no longer be slack. At this point, mast is still secure, even if you let go of it.
Step 4. Now take long line off of horn cleat, but do NOT un-cleat from jib sheet cleat until you are standing sideways as far back in the boat as you can without tipping backwards (my back foot is just forward of the tether pad eye in the bottom of the boat).
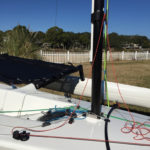
Step 5. Put one hand on the mast approximately shoulder level and un-cleat the long line with the other hand. Now you can ease the mast back slowly, grab with both hands and ease it down until it is resting on the aft beam where it meets the socket (somewhat of a diagonal angle from mast base).
The ability to lay the mast a bit away from the centerline of the boat is one advantage of this system over a fixed, stainless hinge that forces the mast to lay straight down the middle. It gives you room to get into the center of the boat when lifting and lowering the mast. The lines at the base, if adjusted correctly, limit the amount the base can kick up to almost nothing. When initially raising the mast, you will have the mast base just forward of the step and can lean into the tether line for leverage as you are lifting it up off the aft beam.”
Note that the photos are from her boat which had been modified to take part in the Everglades Challenge with a self-tacking jib and bow steering system for use when paddling while sitting on the bow.
-
This topic was modified 4 years, 5 months ago by
.
-
This topic was modified 4 years, 5 months ago by
-
This topic was modified 4 years, 5 months ago by
-
This topic was modified 2 years, 5 months ago by
-
This topic was modified 2 years, 5 months ago by
-
This topic was modified 2 years, 5 months ago by
-
This topic was modified 2 years, 5 months ago by
-
This topic was modified 2 years, 5 months ago by
-
This topic was modified 2 years, 5 months ago by
-
This topic was modified 2 years, 3 months ago by
-
This topic was modified 2 years ago by
-
This topic was modified 2 years ago by
-
This topic was modified 4 years, 5 months ago by


- You must be logged in to reply to this topic.